Review: Videon EdgeCaster EZ (w/ LiveEdge Core 8.5)
这篇综述将强调 Videon的EdgeCaster 视频编码设备(下面的图1) and explore its unique LiveEdge Compute technology for encoding and delivery, as well as how it works with popular video streaming platforms. I’ll also discuss why many video production and remote production teams will likely move to a tool such as this in the future for streaming delivery.

图1. Videon EdgeCaster
关于EdgeCaster
Videon的EdgeCaster goes beyond the capabilities of the traditional video encoding model. 大多数编码器, when a user takes a video and audio source into a video encoder for compression, the device encodes the content into their desired codec to send to the streaming server, 视频平台, 或使用RTMP协议的云. Though it looks like other video encoding appliances with its compact form factor and HDMI and SDI inputs, EdgeCaster adds two key features that make it distinct. It’s a video encoder, a packager, and an origin server all in one box (下面的图2).
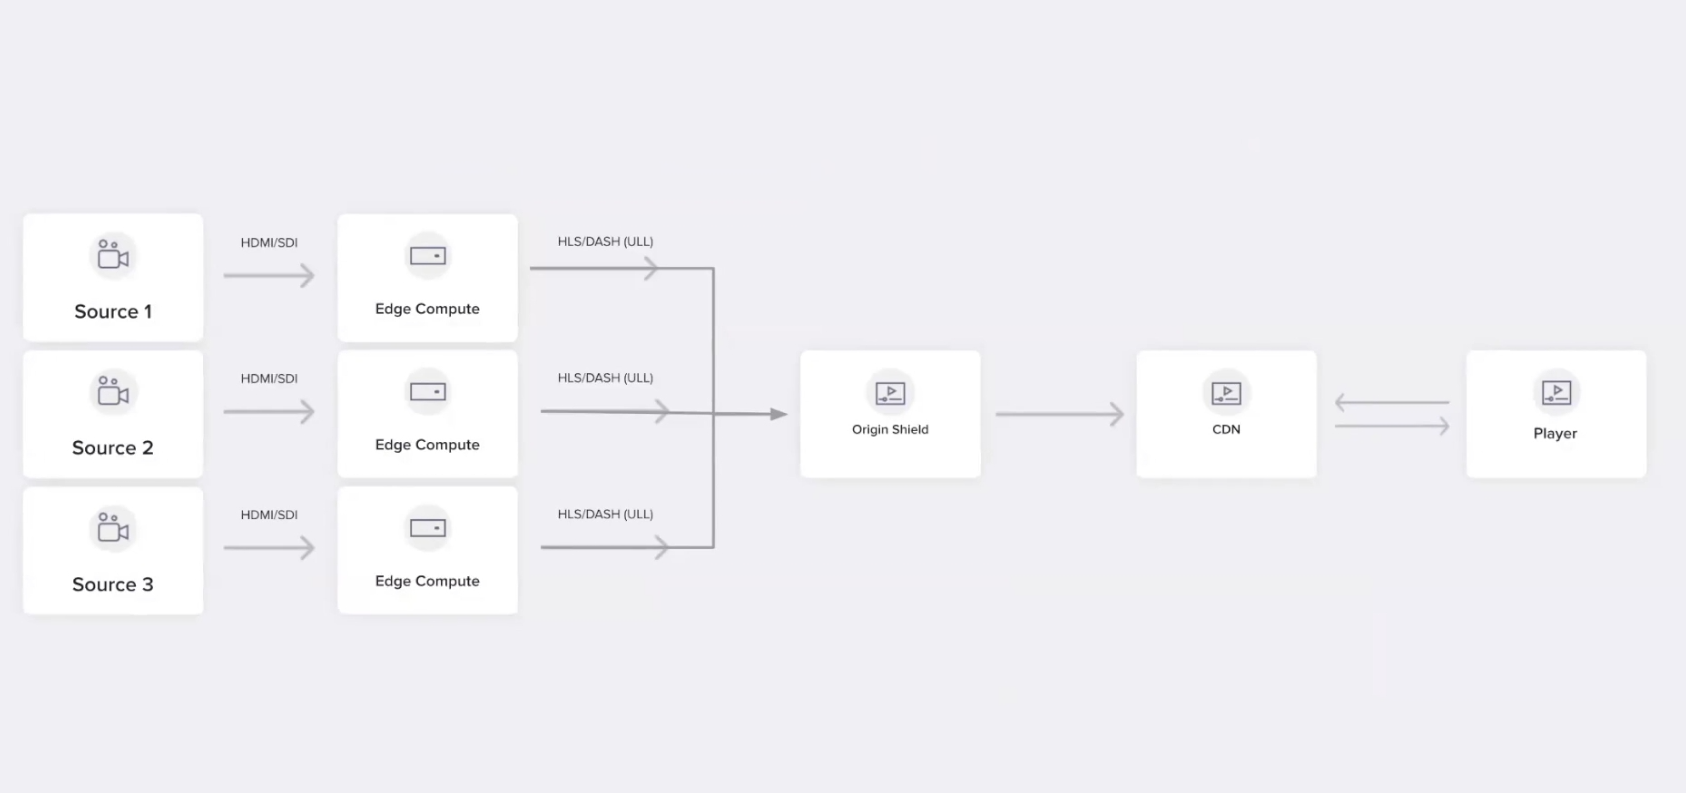
图2. The EdgeCaster workflow, which combines the capabilities of an encoder, packager, and origin server
使用EdgeCaster
If you’re using EdgeCaster for the first time, you’ll need to do the following:
- Connect to your network via an Ethernet cable.
- 通过电源连接电源.
- Connect to your video source via HDMI or SDI.
- 最后,访问http://support.videonlabs.com and select “First Time Setup,” then follow the on-screen instructions.
Once you complete the setup, you’ll configure EdgeCaster by using the 视频发现应用. This will be the method you’ll use for accessing, updating, and using EdgeCaster going forward.
设置HDMI源
In this review, we’ll set up EdgeCaster to use an HDMI source. To begin, turn on your HDMI source and confirm that it’s connected to EdgeCaster. 然后打开视频发现应用程序(图3. 下面).

图3. 视频发现应用程序
接下来,选择Dashboard下面的Open. The Dashboard should open to the AV Input section of the EdgeCaster UI (下面的图4).
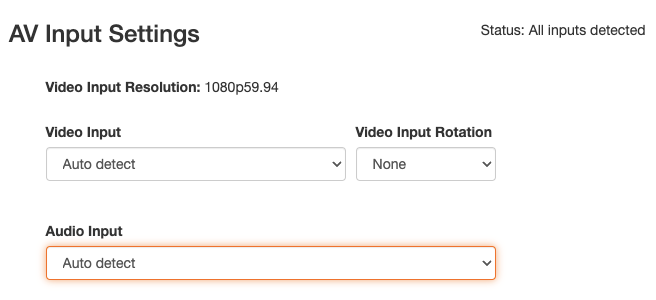
图4. EdgeCaster’s AV Input dialog with my inputs auto-detected
With the Web UI up and running and the source connected to EdgeCaster, your Status should show All inputs detected. This means you can begin configuring your sources.
With Auto detect selected, EdgeCaster will automatically detect your source’s input resolution. 就我而言, 这是1080年p60, though Edge Caster reads my Video Input Resolution reads my input as 1080p with a fractional frame rate of 59.94帧/秒. 另外, 在视频输入和音频输入下, 因为选择了自动检测, 不需要指定输入. This feature will work well for novices who might not know the specs of their input source
The options available under Video Input Resolutions include HDMI Video, SDI Video, and Auto detect. If you move over to the Video Input Rotation, you can select whether you want your video to display without rotation by choosing None. You can also select 90, 180, or 270 degrees to rotate the video. As you travel down to the audio settings, you’ll see the options to choose Embedded Audio, 3.5mm,或自动检测.
在这个测试中,我用a 英雄5黑色GoPro with HDMI output and GoPro’s HDMI Live settings. You can see my AV Input preview in 图5. EdgeCaster gives you the option to turn this on or off. I like having it only since it shows the video source coming in as well as VU meters for audio. 如图所示 图5(下面), you can input the width for your source and choose the frequency of how often you receive updates.

图5. EdgeCaster的AV输入预览
Now, I also want to bring attention to the orange Save button you see to the right of the AV Preview. This is the Save button you’ll use for any changes you make on your current page of the Web UI, and it’s located at the bottom of the Web UI. Be sure to click it whenever you make changes.
The last item we’ll discuss on the AV Input page is the Graphic Overlay (下面的图6). This allows users to add an image to whatever source is used. Similar to the AV Input Preview, you turn this option on or off. To add a new image, you’ll click the pencil icon and select the image you’d like to use. 要删除图像,请单击X按钮. You can adjust the settings you see in 图6 and they’ll appear in AV Input Preview window.

图6. EdgeCaster的图形叠加窗口
If you click the Overlay Position drop-down menu, you’ll see several options available for positioning your image overlay (下面的图7). However, if you can’t decide on an option to use and need a little help, click the ? button to the right of the Overlay Position drop-down menu. This will display a nice graphic showing where the image will display. This is a great feature for advanced users and novices alike.
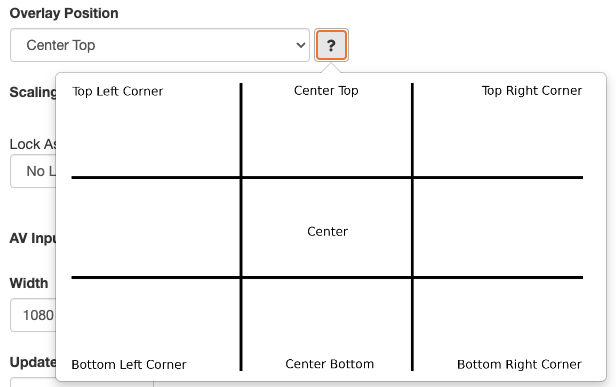
图7. 定位图像叠加
提及的公司及供应商